CUDA series: Part 2 — CUDA Programming Model
Published:
What is Host, Device, and Kernel
The CUDA programming model provides an abstraction of GPU architecture that acts as a bridge between an application and its possible implementation on GPU hardware.
Let’s start with three terminologies of this model.
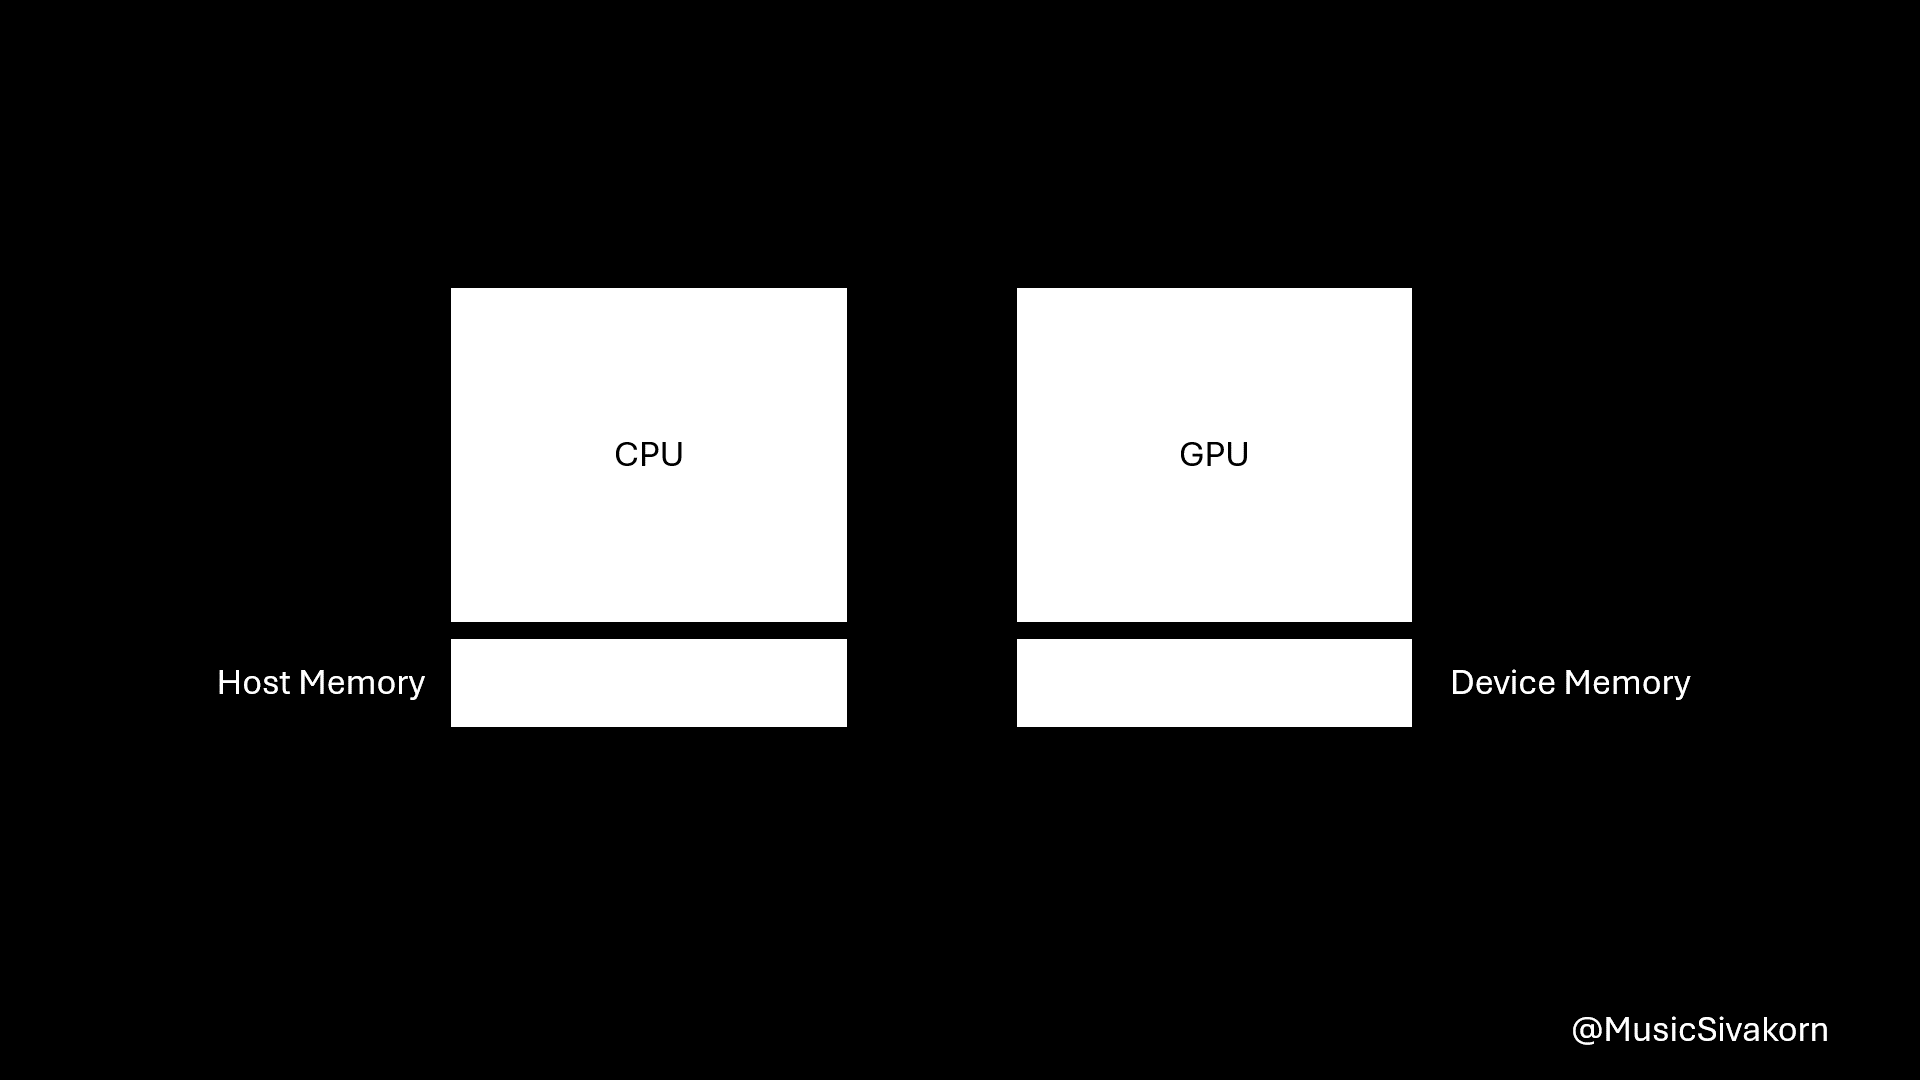
- Host: Host is CPU.
- Device: Device is GPU.
- Kernel: Kernel is a function run on GPU.
Straightforward, isn’t it? These terms are important to understand how to code in CUDA. Please remember it now!
In a file, there can be both host (CPU) and device (GPU) code. We can write both host and device code into a single .cu file. nvcc compiles host code into CPU binary and compiles device code into GPU-executable format, which is then loaded onto the GPU at runtime.
A kernel is a function that is simultaneously executed by many threads, which each thread processes different data. This is analogous to SIMD, where a single instruction operates on multiple data elements concurrently; however, in GPU, it is called Single Instruction Multiple Threads (SIMT). SIMT means multiple threads execute the same instruction on different data simultaneously.
In other words, in SIMD, a single instruction is applied to multiple data items, while in SIMT, multiple threads, each processing its own data, execute the same instruction simultaneously.
The kernel function is determined by using __global__ when declaring the function.
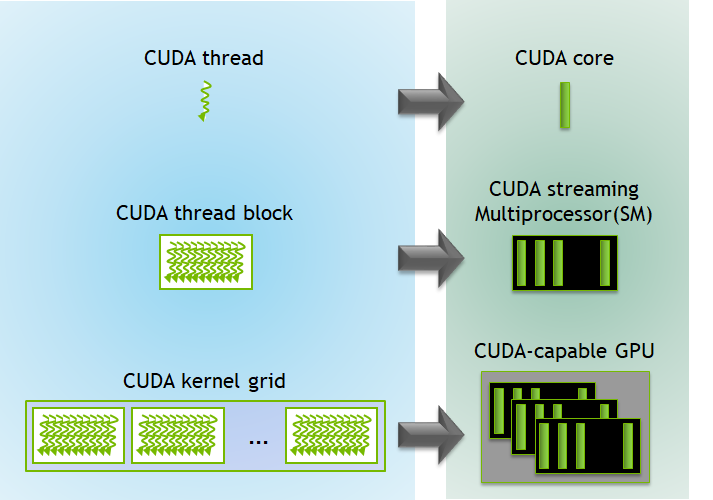
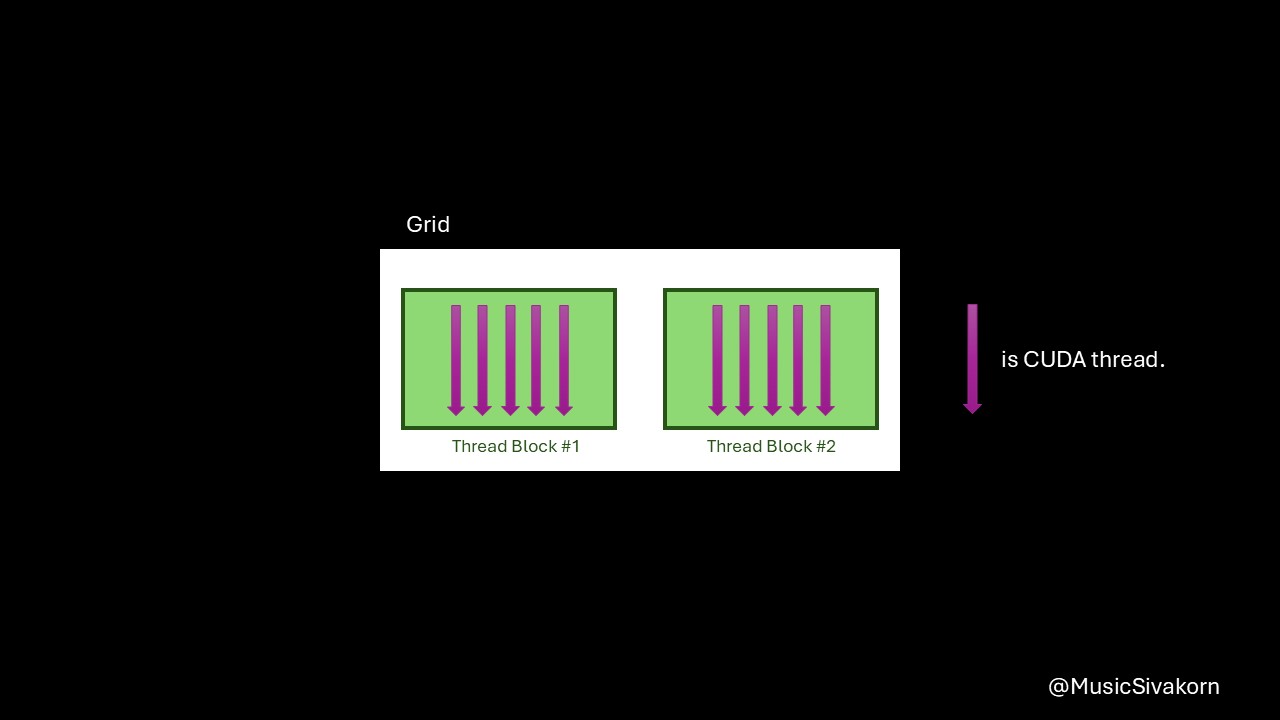
What is Grid, Thread Block, and CUDA Thread
A CUDA thread is NOT the same as a thread in an operating system. The CUDA thread is only an abstraction of the CUDA programming model to be the lowest level of parallelism unit. From now on, I will only call it as “thread”, but please note in your mind that it is not the same as the normal thread.
Basically, each thread executes its instructions on a CUDA core.
Several threads are combined to be a Thread Block. Each thread block is scheduled to a Streaming Multiprocessor (SM) which contains several CUDA cores together. All threads in the thread block execute entirely on the same SM, and multiple thread blocks can be scheduled to be executed on one SM; however, threads in the thread blocks cannot span multiple SMs.
To be more precise, threads in each thread block are grouped into multiple groups of 32 threads, and each group is called a warp. The warp is the unit that is scheduled to the SM. However, all threads within the same thread block are guaranteed to be executed on the same SM. The reason that each group has 32 threads is because it is defined by NVIDIA.
Finally, multiple thread blocks are combined to be a Kernel Grid. Each kernel grid is executed by a complete GPU unit containing several SMs.
Kernel execution on GPU. Ref: NVIDIA
How to Define and Call a Kernel Function
Until now, it has a lot of theories. You may already feel bored. Let see how these concepts can be used to implement a program to run on GPU!
Let’s start with the simple program. It is a program to just print the thread and block id. Let this file names as hello_world.cu. How to install CUDA is out-of-scope of this blog, but you can find a tutorial from the official NVIDIA website.
#include "stdio.h"
#include "cuda_runtime.h"

__global__ void helloWorldKernel() {
    printf("Hello, World from Thread %d of Block %d!\n",
    threadIdx.x, blockIdx.x);
}

int main(){
    // Launch the kernel with 10 threads. 5 threads per block.
    helloWorldKernel<<<2, 5>>>();

    // Ensure the kernel finishes executing before the CPU proceeds
    cudaDeviceSynchronize();

    return 0;
}

// To run this code, compile it with:
// nvcc hello_world.cu -o hello_world
The result is
Hello, World from Thread 0 of Block 1!
Hello, World from Thread 1 of Block 1!
Hello, World from Thread 2 of Block 1!
Hello, World from Thread 3 of Block 1!
Hello, World from Thread 4 of Block 1!
Hello, World from Thread 0 of Block 0!
Hello, World from Thread 1 of Block 0!
Hello, World from Thread 2 of Block 0!
Hello, World from Thread 3 of Block 0!
Hello, World from Thread 4 of Block 0!
 How threads are aligned for this program.
In this program, helloWorldKernel is a kernel function run on GPU. To call it from the host, a special syntax kernel_name<<dimGrid, dimBlock>>(..parameters..) is required. dimGrid specifies the number of thread blocks per grid, and dimBlock specifies the number of threads per thread block.
In this program, helloWorldKernel<<2,5>> tells that this kernel function uses 2 thread blocks having 5 threads each. Therefore, there are 10 threads in total. The output log shows that there are block 0 and block 1, and each block has thread from number 0 to 4.
The variable blockIdx tells the ID of the current thread block within the grid, and threadIdx tells the ID of the current thread within the current thread block. From the example, there are thread block having the ID #0 and #1 within the grid, and there are thread having the ID from #0 to #4 within each thread block.
CUDA Memory Allocation and Transferring
GPU has its own memory, which is separated from CPU memory. Data must be copied to host/device memory before host/device can use it.
If you allocate an array with data on the host, and you want it to be processed on the device, you need to copy this array to device memory before calling a kernel function. Then, if you want to further process this data on the host, you need to copy it back from the device to the host.
Let’s see the example. The following example code basically doubles the value of each array element. It follows these steps.
- Allocate memory on the device.
- Copy data from the host to the device.
- Call a kernel function to process the data (array) on the device.
- Copy data back to the host.
- Deallocate allocated memory on the device.
 Visualization of how the example works.
#include "stdio.h"
#include "cuda_runtime.h"

__global__ void init(float* array){
    array[threadIdx.x] = array[threadIdx.x] + threadIdx.x;
}

int main()
{
    size_t bytes = sizeof(float) * 10; // Allocate space for 10 floats
    float h_arr[10]; // Host array
    float* d_arr; // Device array
    for (int i = 0; i < 10; i++) h_arr[i] = i + 0.0f;
    // Allocate memory on the GPU
    cudaMalloc((void**)&d_arr, bytes);
    // Copy initial values to device
    cudaMemcpy(d_arr, h_arr, bytes, cudaMemcpyHostToDevice);
    // Launch kernel to fill the array
    init<<<1, 10>>>(d_arr);
    // Copy the result back to the host
    cudaMemcpy(h_arr, d_arr, bytes, cudaMemcpyDeviceToHost);
    // Free the device memory
    cudaFree(d_arr);

    for (int i = 0; i < 10; i++) printf("h_arr[%d] = %f\n", i, h_arr[i]);
}

// to run this code, compile it with:
// nvcc fill_array.cu -o fill_array
Initially, the host has an array [0.0,1.0,...,8.0,9.0]. cudaMalloc allocates an arrayin the device memory with the size for 10 floats. cudaMemcpy copies data in the host array to the device array. init is then called to add the thread index to each element. The data in the device array is then copied back to the host array using cudaMemcpy. Finally, the allocated array in the device is deallocated using cudaFree. The final result of h_arr is [0.0,2.0,4.0,...,16.0,18.0].
Extending to Multi-Dimensional CUDA Memory
Until now, we have only worked on 1-dimensional CUDA grids and blocks. In fact, if the original data is in a multi-dimensional data, we can assign a multi-dimensional CUDA memory to process this data. It is easier to map two memory spaces having the same dimension.
 How CUDA threads are aligned in 2D memory. Adapted from Wikipedia
When determining the dimension of grids and blocks, we can use a datatype dim3 containing a coordinate (x,y,z). We can determine it partially or fully. For example, dim3 gridDim(2,3) means there are two thread blocks on the x-axis, and three blocks on the y-axis, which can be aligned like this.
(0,0) (1,0)
(0,1) (1,1)
(0,2) (1,2)
We do not need to determine all elements to dim3.
Let’s see the example. Most tutorials will use a matrix multiplication example; however, I think that example is too difficult for a beginner. Let’s have an easier example.
Assuming that we have a global 2D array, we want to use GPU to double each element of this array in parallel.
int twoD_array[3][4] = {
    {1, 2, 3, 4},
    {5, 6, 7, 8},
    {9, 10, 11, 12}
};
These are steps to implement this program.
- Flatten from 2D to 1D array so that it can be used by
cudaMemcpy. - Allocate the device memory using
cudaMalloc. - Copy the data from a host to a device memory using
cudaMemcpy. - Implement a kernel function to double each element and call it. A difficult point here is to determine a grid and thread block size. I will explain them later. Bear with me a bit!
- Copy the data back to the host.
- Deallocate the device memory.
#include "stdio.h"
#include "cuda_runtime.h"

__global__ void doubleMatrix(int* data, int width, int height) {
    int global_x = blockIdx.x * blockDim.x + threadIdx.x; // column index
    int global_y = blockIdx.y * blockDim.y + threadIdx.y; // row index

    // Compute the flattened index
    int index = global_y * width + global_x;

    // Bounds check
    if (global_x < width && global_y < height) {
        data[index] *= 2;
    }
}

int twoD_array[3][4] = {
    {1, 2, 3, 4},
    {5, 6, 7, 8},
    {9, 10, 11, 12}
};

int main() {
    // Number of columns
    const int width = 4;
    // Number of rows
    const int height = 3;
    // Total size in bytes
    size_t bytes = sizeof(int) * width * height;

    // Device pointer
    int* d_data;
    // Allocate memory on the GPU
    cudaMalloc((void**)&d_data, bytes);

    // flatten the 2D array into a 1D array for copying
    // must be done before using cudaMemcpy
    int h_data[width * height];
    for (int i = 0; i < height; i++) {
        for (int j = 0; j < width; j++) {
            h_data[i * width + j] = twoD_array[i][j];
        }
    }

    // Copy data to device
    cudaMemcpy(d_data, h_data, bytes, cudaMemcpyHostToDevice);

    // Define block size (2x2 threads)
    dim3 blockSize(2, 2);
    // Define grid size
    dim3 gridSize(
                  (width + blockSize.x - 1) / blockSize.x,
                  (height + blockSize.y - 1) / blockSize.y
                 );

    doubleMatrix<<<gridSize, blockSize>>>(d_data, width, height);
    cudaDeviceSynchronize();

    // Copy result back to host
    cudaMemcpy(h_data, d_data, bytes, cudaMemcpyDeviceToHost);

    printf("Doubled 2D Array:\n");
    for (int i = 0; i < height; i++) {
        for (int j = 0; j < width; j++) {
            printf("%d ", h_data[i * width + j]);
        }
        printf("\n");
    }

    // Free device memory
    cudaFree(d_data);
    return 0;
}

// to compile this code, use:
// nvcc 2d_cuda.cu -o 2d_cuda
// to run the compiled code, use:
// ./2d_cuda
Now, I will explain the difficult points, which are blockSize, gridSize, and the how the kernel function works.
We can determine the size of blockSize by ourselves. The method of choosing the suitable size is out of scope of this part. So, let’s assume that each thread block has a size of 2 by 2, which is dim3 blockSize(2,2).
Then, we have to find the correct size of grid so that all elements in twoD_array have their own CUDA thread.
Let’s see the simpler scenario first. Assume that each box has 2 pens. If we want 4 pens, we must have 2 boxes. However, if we want 7 pens, but we cannot open a box to take only some pens, we need to have 4 boxes to have 7 pens (8 in fact, but we can just throw away one extra pen or sell it to our friend).
It is the same as the method to find the number of thread blocks. If the array has a width of 4, and each thread block has 2 threads, we need 2 thread blocks in this side.
In the same way, if the array has a height of 3, we need 2 thread blocks in this side. This is the reason of a weird formula (width + blockSize.x — 1) / blockSize.x and (height + blockSize.y — 1) / blockSize.y. In C++, for int datatype, it will ignore all decimal points. 3/2 becomes 1. One thread block is not enough on the length size is not enough to process all 12 elements in the array twoD_array.
Therefore, we need to add blockSize.x — 1 more to assure that there will be enough thread blocks. In this example, blockSize.x is 2. So, it is (3+2)/2, which is 2. Two thread blocks on the length size now provide enough threads to process 12 elements in the array.
Then, the program will distribute each element in the array to each CUDA thread. You may think that there are 16 threads, but there are only 12 elements in the array. No worries! We do not care about any optimization here. Let them be idle.
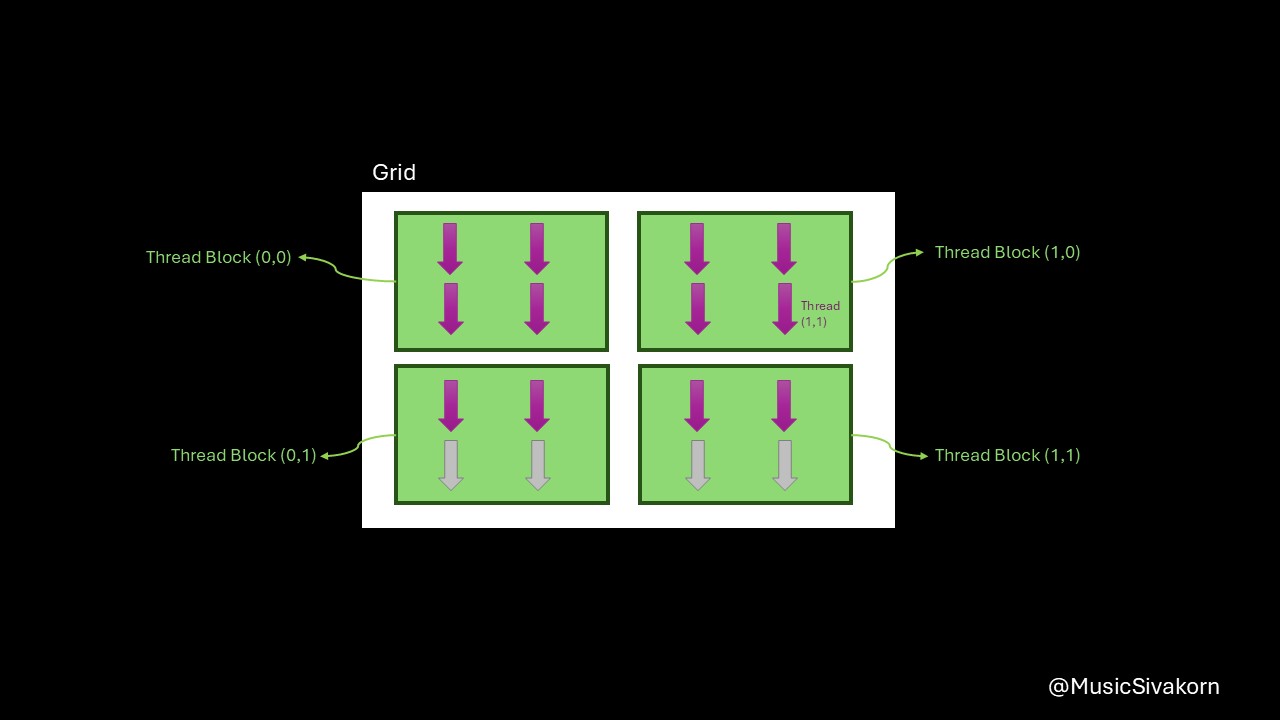
How each CUDA thread works is determined in __global__ void doubleMatrix. Let’s pick one CUDA thread to see which element in the twoD_array is assigned to this thread. Let it be the Thread (1,1) in Thread Block (1,0).
I will paste the kernel function here again so that you don’t have to scroll back and forth.
__global__ void doubleMatrix(int* data, int width, int height) {
    int global_x = blockIdx.x * blockDim.x + threadIdx.x; // column index
    int global_y = blockIdx.y * blockDim.y + threadIdx.y; // row index

    // Compute the flattened index
    int index = global_y * width + global_x;

    // Bounds check
    if (global_x < width && global_y < height) {
        data[index] *= 2;
    }
}
From our assigned grid and block size, we know these values of this thread.
blockIdx.xis 1, andblockIdx.yis 0.blockDim.xandblockDim.yare 2 because our thread block size is 2 by 2.threadIdx.xis 1, andthreadIdx.yis 1.
Then, we can find global_x and global_y.
global_x is 1x2 + 1 = 3. global_y is 0x2 + 1 = 1.
As a result, the element twoD_array[1][3], containing a value 8, is assigned to this CUDA thread. However, we have to access this element from d_data , which is 1D array. So, the index [1][3] on the 1D array is at the position 7, which can be calculated from global_y * width + global_x having width equals 4 (the twoD_array width).
For the remaining threads, they can know their data by using the same method. The final result showing the element assigned to each CUDA thread is shown below.
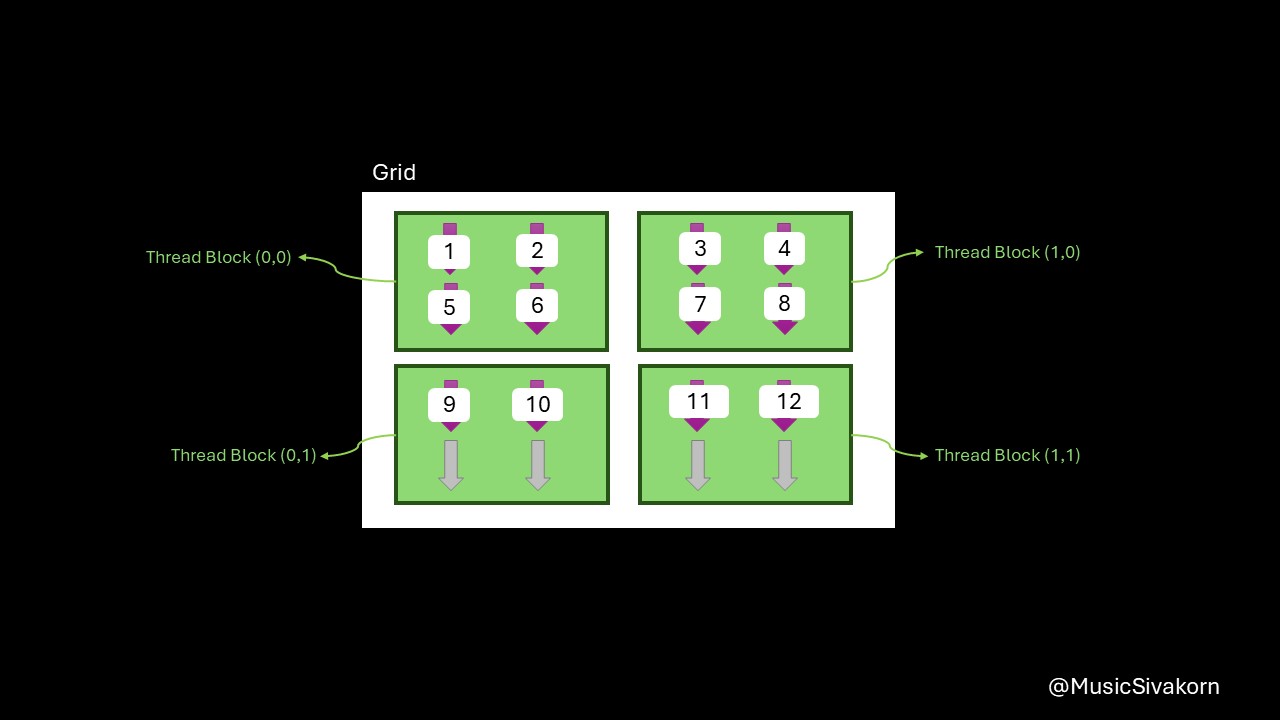 Each element of twoD_array is assigned to each CUDA thread.
Then, each thread doubles its value simultaneously. After all threads finish its work, the remaining steps are as described before.
Pageable and Pinned Host Memory
I know we have already covered a lot of topics, but let’s have this topic to be the last topic!
Normally, the host data allocations are pageable by default. It allocates a page in a virtual memory to map to a frame in a physical memory. The virtual memory is intended to abstract out the physical memory fragmentation. Although a set of contiguous data is, in fact, scattered in the physical memory, the virtual memory makes it to seem contiguous. This is not a problem in the CPU perspective, but it is a problem in the GPU view.
When GPU transfers data, it needs to communicate directly with the physical memory using DMA. DMA prefers a single contiguous block of physical memory. If the data is physically fragmented, the GPU’s DMA engine would need to perform multiple, smaller, separate DMA operations for each non-contiguous physical page, which is slow.
As a result, CUDA driver copies data from a pageable host memory to a physically contiguous memory called pinned memory first, and GPU then copies data using DMA from this pinned memory instead. This method performs a defragmentation the data into a single contiguous physical block before performing a high-speed DMA transfer to the GPU.
But performing this copying introduces an extra step of data transfer, which becomes an overhead. Would it be better if we just allocate the memory in the pinned host memory from the beginning?
Yes, it is!
When we allocate the pinned memory, the operating system knows that this contiguous block of memory must not be moved and separated. In CUDA, this memory can be allocated by using cudaMallocHost() and freed by using cudaFreeHost().
 Ref: NVIDIA
The pinned memory is also beneficial when we want to do an asynchronous data transfer using CUDA Stream. It allows CPU to continue working while the data transfer is still ongoing. It is about a heterogeneous computing, but I will not explain and cover about this now.
Allocating data in the pinned memory seems good, but we should not allocate too much memory in this memory. The operating system is designed to optimize the memory system. Using too much pinned memory will disturb the OS optimization work, which can impact the performance since the amount of virtual memory is limited.
Let’s see the example.
#include <stdio.h>
#include <stdlib.h> // For malloc and free
#include <cuda_runtime.h>

__global__ void addOffset(float* array, float offset) {
    int idx = blockIdx.x * blockDim.x + threadIdx.x;
    array[idx] = array[idx] + offset;
}

int main() {
    // --- Configuration ---
    // 100 million floats (approx 400 MB)
    const int NUM_ELEMENTS = 100 * 1024 * 1024;
    size_t bytes = sizeof(float) * NUM_ELEMENTS;
    // Number of transfers to average measurements
    const int NUM_TRANSFERS = 50;

    // --- Allocate Device Memory (common for both cases) ---
    float* d_arr;
    cudaMalloc((void**)&d_arr, bytes);

    // --- CUDA Event setup for timing ---
    cudaEvent_t start, stop;
    cudaEventCreate(&start);
    cudaEventCreate(&stop);
    float milliseconds = 0;

    printf("--- Performance Comparison (Host to Device Transfers) ---\n");
    printf("Data size: %.2f MB (NUM_ELEMENTS = %d)\n", (double)bytes / (1024 * 1024), NUM_ELEMENTS);
    printf("Number of transfers for averaging: %d\n\n", NUM_TRANSFERS);

    // ===================================================================
    // --- Case 1: Using Pageable Memory (malloc) ---
    // ===================================================================

    float* h_pageable_arr;
    // Allocate pageable host memory
    h_pageable_arr = (float*)malloc(bytes);

    // Initialize host array with some dummy data
    for (int i = 0; i < NUM_ELEMENTS; ++i) {
        h_pageable_arr[i] = (float)i;
    }

    milliseconds = 0;
    printf("Measuring transfers with Pageable Memory (malloc):\n");

    // Record start time for the first transfer
    cudaEventRecord(start, 0);

    for (int i = 0; i < NUM_TRANSFERS; ++i) {
       cudaMemcpy(d_arr, h_pageable_arr, bytes, cudaMemcpyHostToDevice);
    }

    // Record stop time after all transfers
    cudaEventRecord(stop, 0);
    // Wait for all transfers to complete
    cudaEventSynchronize(stop);
    // Calculate elapsed time
    cudaEventElapsedTime(&milliseconds, start, stop);

    printf("  Total transfer time (HtoD): %.2f ms\n", milliseconds);
    printf("  Average transfer time (HtoD): %.2f ms\n\n", milliseconds / NUM_TRANSFERS);

    // Free pageable host memory
    free(h_pageable_arr);

    // ===================================================================
    // --- Case 2: Using Pinned Memory (cudaMallocHost) ---
    // ===================================================================

    float* h_pinned_arr;
    // Allocate pinned host memory
    cudaMallocHost((void**)&h_pinned_arr, bytes);

    // Initialize host array with some dummy data
    for (int i = 0; i < NUM_ELEMENTS; ++i) {
        h_pinned_arr[i] = (float)i;
    }

    // Reset timer for this section
    milliseconds = 0;
    printf("Measuring transfers with Pinned Memory (cudaMallocHost):\n");

    cudaEventRecord(start, 0);

    for (int i = 0; i < NUM_TRANSFERS; ++i) {
        cudaMemcpy(d_arr, h_pinned_arr, bytes, cudaMemcpyHostToDevice);
    }

    cudaEventRecord(stop, 0);
    cudaEventSynchronize(stop);
    cudaEventElapsedTime(&milliseconds, start, stop);

    printf("  Total transfer time (HtoD): %.2f ms\n", milliseconds);
    printf("  Average transfer time (HtoD): %.2f ms\n\n", milliseconds / NUM_TRANSFERS);

    cudaFreeHost(h_pinned_arr); // Free pinned host memory
    cudaFree(d_arr); // Free device memory
    cudaEventDestroy(start); // Clean up CUDA events
    cudaEventDestroy(stop); // Clean up CUDA events

    return 0;
}
The result is
--- Performance Comparison (Host to Device Transfers) ---
Data size: 400.00 MB (NUM_ELEMENTS = 104857600)
Number of transfers for averaging: 50

Measuring transfers with Pageable Memory (malloc):
  Total transfer time (HtoD): 3299.54 ms
  Average transfer time (HtoD): 65.99 ms

Measuring transfers with Pinned Memory (cudaMallocHost):
  Total transfer time (HtoD): 3144.85 ms
  Average transfer time (HtoD): 62.90 ms
The example has two cases. Both use CUDA Event to measure time. You must not use std::chrono::high_resolution_clock to measure the GPU timing. It is only for CPU timing.
As a result, we get a speedup, albeit only a little, from using cudaMallocHost.
So, this is the end of this part. The next part will discuss coalescing and tilling technique that can make the program faster.
If you enjoy this blog, you can support me with a cup of coffee. Thank you for reading until here and see you then!
This blog is originally published in Medium.